
Notice
Recent Posts
Recent Comments
Link
| 일 | 월 | 화 | 수 | 목 | 금 | 토 |
|---|---|---|---|---|---|---|
| 1 | ||||||
| 2 | 3 | 4 | 5 | 6 | 7 | 8 |
| 9 | 10 | 11 | 12 | 13 | 14 | 15 |
| 16 | 17 | 18 | 19 | 20 | 21 | 22 |
| 23 | 24 | 25 | 26 | 27 | 28 |
Tags
- 유데미
- 코딩국비지원
- 플러터
- 스나이퍼팩토리
- 0원코딩인강
- 내일배움카드사용처
- Udemy
- 러닝핏습관챌린지
- Flutter
- 러닝핏인강
- K디지털기초역량훈련
- 내일배움카드인강
- 웹개발
- 앱개발
- IT개발캠프
- 국비코딩
- 웅진씽크빅
- 내일배움투어
- 습관챌린지
- 인사이드아웃
- 안드로이드
- 러닝핏
- 부트캠프
- 개발
- 국비지원코딩
- K디지털크레딧
- 국비지원파이썬
- ios
- 고용노동부국비지원
- 개발자부트캠프
Archives
- Today
- Total
매일 땡기는 마라 코딩
[9주 완성 프로젝트 캠프 : 플러터(유데미x스나이퍼팩토리)] 4일차 과제 - 사칙연산 본문
요구사항

 012
012
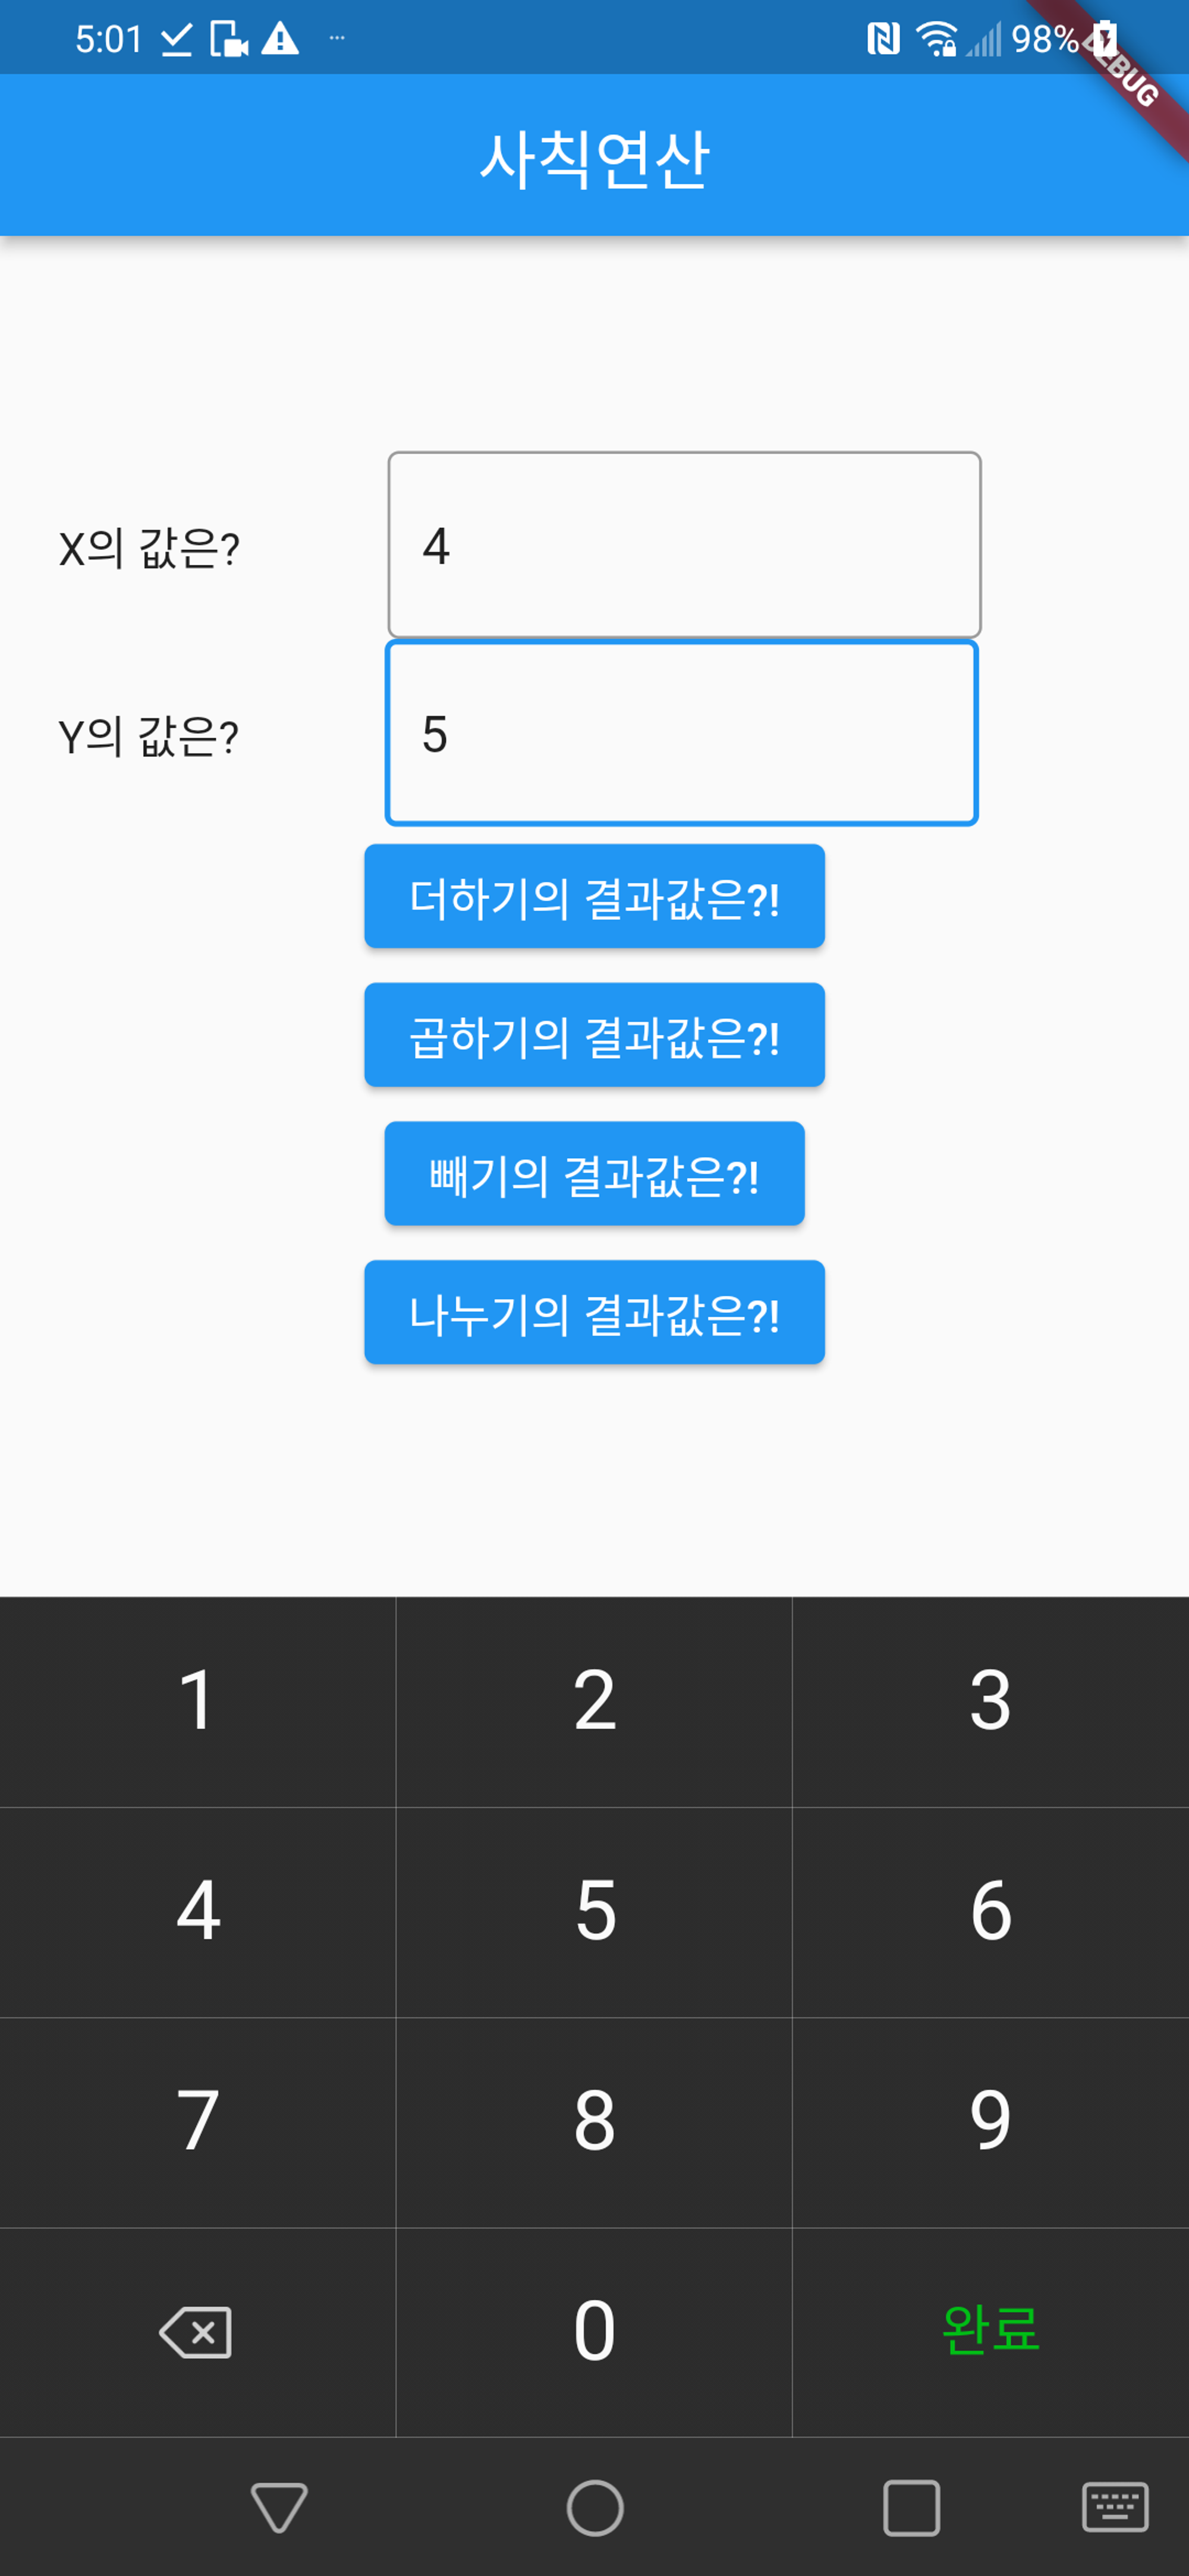
과제 1. 다음 조건을 확인하고, 첨부된 3가지의 이미지 화면과 같은 결과를 만드세요.
- TextField를 두 개 사용하여 변수에 저장합니다.
- 사칙연산이 가능하도록 버튼을 4개 만듭니다. 각각의 버튼(+,-,*,/)를 누르면 해당 연산자에 맞는 결과값을 출력합니다.
- 이 때, 결과값은 **다이얼로그(Dialog)**로 출력합니다. Dialog란, 앱에서 팝업창처럼 화면위에 화면을 띄우는것을 말합니다. 일반적으로 showDialog가 있고, AlertDialog를 주로 사용합니다.
- 계산 결과를 result로 넣으면, 다이얼로그를 출력하는 예시코드가 제공됩니다. 해당 코드를 활용하여 결과를 화면에 출력하세요.
사전 지식
"Dialog"
showDialog
- barrierDismissible : 바깥 영역 터치시 닫을지 여부
- title : 제목
- center : 내용
- actions : 버튼
showResultDialog(BuildContext context, var result) {
	showDialog(
		context: context,
		builder: (context) {
			return Dialog(
				shape: RoundedRectangleBorder(
					borderRadius: BorderRadius.circular(8.0)
				),
				child: SizedBox(
					width: MediaQuery.of(context).size.width / 2,
					height: 150,
					child: Center(
						child: Text("$result",
							style: const TextStyle(fontWeight: FontWeight.bold),
						)
					),
				),
			);
		},
	);
}
TextField의 decoration
InputDecoration으로 설정할 수 있다.
- hintText: TextField에 작성해야 하는 내용에 대한 힌트를 출력해 준다.
- focusedBorder: TextField가 선택되었을 때 border 설정.
- enabledBorder: TextField가 선택되지 않았을 때 border 설정.
- borderSide: 왼쪽 오른쪽 등 특정 위치에만 border 설정.
TextField의 밑줄 제거?
border: InputBorder.none를 설정하면 된다.
그 외
TextField는 Row를 지정하면 오류가 난다?
-> Container로 감싸 주면 오류가 나지 않는다.
코드
main.dart
import 'package:flutter/material.dart';

void main() {
  runApp(const MyApp());
}

class MyApp extends StatelessWidget {
  const MyApp({super.key});
  @override
  Widget build(BuildContext context) {
    return const MaterialApp(
      home: calculation(),
    );
  }
}

class calculation extends StatelessWidget {
  const calculation({super.key});

  showResultDialog(BuildContext context, var result) {
    showDialog(
      context: context,
      builder: (context) {
        return Dialog(
          shape:
              RoundedRectangleBorder(borderRadius: BorderRadius.circular(8.0)),
          child: SizedBox(
            width: MediaQuery.of(context).size.width / 2,
            height: 150,
            child: Center(
                child: Text(
              "$result",
              style: const TextStyle(fontWeight: FontWeight.bold),
            )),
          ),
        );
      },
    );
  }

  // This widget is the root of your application.
  @override
  Widget build(BuildContext context) {
    int x = 0;
    int y = 0;
    var result = 0;

    return Scaffold(
      appBar: AppBar(
        title: const Text(
          '사칙연산',
          style: TextStyle(fontSize: 24),
        ),
      ),
      body: Padding(
        padding: const EdgeInsets.all(22.0),
        child: Column(
          mainAxisAlignment: MainAxisAlignment.center,
          children: [
            Row(
              children: [
                const Text('X의 값은?'),
                SizedBox(
                  width: 240,
                  height: 60,
                  child: Padding(
                    padding: const EdgeInsets.only(left: 48),
                    child: TextField(
                      onChanged: (value) {
                        x = int.parse(value);
                      },
                      decoration: const InputDecoration(
                          hintText: 'x값을 입력하세요.',
                          focusedBorder: OutlineInputBorder(
                              borderSide: BorderSide(color: Colors.blue)),
                          enabledBorder: OutlineInputBorder(
                              borderSide: BorderSide(color: Colors.grey))),
                    ),
                  ),
                )
              ],
            ),
            Row(
              children: [
                const Text('Y의 값은?'),
                SizedBox(
                  width: 240,
                  height: 60,
                  child: Padding(
                    padding: const EdgeInsets.only(left: 48),
                    child: TextField(
                      onChanged: (value) {
                        y = int.parse(value);
                      },
                      decoration: const InputDecoration(
                          hintText: 'y값을 입력하세요.',
                          focusedBorder: OutlineInputBorder(
                              borderSide: BorderSide(color: Colors.blue)),
                          enabledBorder: OutlineInputBorder(
                              borderSide: BorderSide(color: Colors.grey))),
                    ),
                  ),
                )
              ],
            ),
            ElevatedButton(
                onPressed: () {
                  result = x + y;
                  showResultDialog(context, result);
                },
                child: const Text(
                  '더하기의 결과값은?!',
                  style: TextStyle(fontSize: 16),
                )),
            ElevatedButton(
                onPressed: () {
                  result = x * y;
                  showResultDialog(context, result);
                },
                child: const Text(
                  '곱하기의 결과값은?!',
                  style: TextStyle(fontSize: 16),
                )),
            ElevatedButton(
                onPressed: () {
                  result = x - y;
                  showResultDialog(context, result);
                },
                child: const Text(
                  '빼기의 결과값은?!',
                  style: TextStyle(fontSize: 16),
                )),
            ElevatedButton(
                onPressed: () {
                  result = (x / y).toInt();
                  showResultDialog(context, result);
                },
                child: const Text(
                  '나누기의 결과값은?!',
                  style: TextStyle(fontSize: 16),
                ))
          ],
        ),
      ),
    );
  }
}
결과
회고
이 과제를 하면서 다이얼로그가 정상적으로 출력되지 않아 답답했던 기억이 있다. 빌드 관련으로 코드에 문제가 있었던 듯 한데, 이 부분은 조금 더 공부해 보면 좋을 듯하다.
그건 그렇고 나 이 때 완성을 안 하고 제출했군,,, 사칙연산이 더하기로만 구현이 되어 있고, 텍스트 필드에서 받은 값을 다른 변수에 저장하고, 문자열 안 맞춰서 오류 나고... 블로그 쓰면서 후다닥 수정했다. 항상 확인하는 습관을 가질 것!
참고 자료
- https://jinhan38.com/120
- https://acaroom.net/ko/blog/youngdeok/%ED%94%8C%EB%9F%AC%ED%84%B0-%EC%9C%84%EC%A0%AF%EC%97%90%EC%84%9C-border-%ED%98%B9%EC%9D%80-outline-%EC%A7%80%EC%A0%95
- https://api.flutter.dev/flutter/material/Dialog-class.html

본 후기는 유데미-스나이퍼팩토리 9주 완성 프로젝트캠프 학습 일지 후기로 작성 되었습니다.
#유데미 #udemy #스나이퍼팩토리 #웅진씽크빅 #인사이드아웃 #IT개발캠프 #개발자부트캠프 #웹개발 #앱개발 #플러터 #flutter #개발 #안드로이드 #ios #단기캠프
728x90
'Flutter' 카테고리의 다른 글
| [9주 완성 프로젝트 캠프 : 플러터(유데미x스나이퍼팩토리)] 5일차 과제 - 페이지 이동 (1) | 2023.10.22 |
|---|---|
| [9주 완성 프로젝트 캠프 : 플러터(유데미x스나이퍼팩토리)] 4일차 과제 - 키오스크 앱 (1) | 2023.10.22 |
| [9주 완성 프로젝트 캠프 : 플러터(유데미x스나이퍼팩토리)] 3일차 과제 - 유튜브 뮤직 클론코딩 (5) | 2023.10.22 |
| [9주 완성 프로젝트 캠프 : 플러터(유데미x스나이퍼팩토리)] 3일차 과제 - 스타벅스 클론코딩 (0) | 2023.09.21 |
| [9주 완성 프로젝트 캠프 : 플러터(유데미x스나이퍼팩토리)] 2일차 과제 (0) | 2023.09.21 |
'Flutter' Related Articles
more


